


Docker's widespread adoption in cloud environments has made it a prime target for attackers seeking to exploit its API or container misconfigurations. One such threat is Docker hijacking malware, that compromises Docker hosts to deploy and execute malicious containers. This two-part blog series will walk you through how to properly investigate such incidents.
In Part 1, we will look at analyzing the compromised Docker host. By examining both the network packet capture and disk image of the affected system, we can piece together how the attacker gained control and what actions they performed.
The attack we’re analyzing was captured using our high-interaction honeypot. This honeypot runs fully functional Linux systems that are deliberately configured with realistic vulnerabilities to lure attackers. While the honeypot provides automated analysis, we will intentionally ignore that and focus on manual investigative techniques—just as you would in a real forensic scenario.
Network Capture Analysis
When analyzing intrusions, the easiest place to start is typically the network data. This is because it gives you an immediate insight into every packet the attacker ever sent to the system, which allows you to see exactly how the compromise took place.
Identifying and Understanding Docker Traffic
We’ll begin by opening the packet capture from the compromised instance in Wireshark. Wireshark is a tool that allows you to visually examine packets and provides a suite of tools for analyzing the traffic.

The main packet listing view in Wireshark
In this case there are over 39,000 packets, and not all of those are relevant. As we know the attack compromised Docker, we can look for specifically Docker related traffic. Reading the documentation, we can learn that Docker’s API runs on port 2375 and uses HTTP. Applying the protocol and port as a filter in Wireshark, we can narrow it down to just 345 packets to examine, which is much more manageable.

Filtered packet listing
As we can see, these are all HTTP requests being made from various IP addresses to the Docker API. Looking through the packets manually, we can quickly spot some interesting entries in the “Info” column, and clicking on a packet we can view more information about a specific request.

We can see here the attacker sent a request to download the Ubuntu 18.04 Docker image from Docker’s repository hub, and in a subsequent request created a container from it. We can see in the user agent that the Docker CLI is being used to perform this request, which is common in attacks targeting Docker, as attackers do not want to recreate the API themselves.
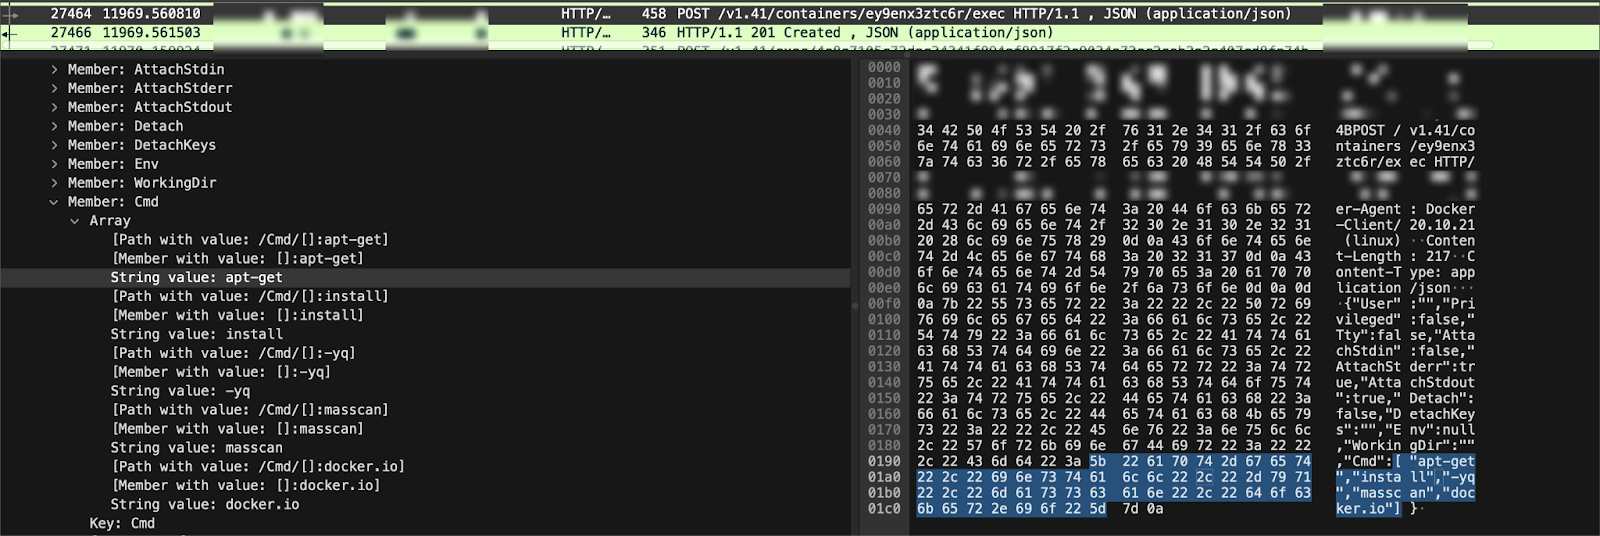
We can also see a request to the exec endpoint, which the attacker uses to run subsequent commands in the container. An increasingly common attack vector for Docker is to create a generic container from well-known images, and then run their attacks in there via an initial CMD entrypoint defined in the create request, or by running exec requests on the container, or sometimes both. In this case we can see the attacker installing masscan and the Docker CLI in the container. As discussed previously, this initial attack was executed using the Docker CLI, so it is likely in this case the attacker intends to use the Docker container to discover new hosts (via masscan) and infect them (via the Docker CLI). This type of campaign is known as a worm.
Finally, the attacker uploads two files called “cloud” and “nginx” to /usr/bin. Often malware will grab payloads from a C2 server, however as this is a worm, the payload can be directly uploaded from the infected attacker node to the new victim node, allowing it to be more resilient. We could dump the body of the request to retrieve the file, however as we are planning to analyse the disk as well, we will grab it then.

vnd.docker streams
When an exec request occurs, the standard in and standard out stream are made accessible via the API. When this happens, the API responds with a HTTP 101 upgraded, and upgrades the connection to raw TCP, with the content-type set to application/vnd.docker.raw-stream. In practice, this is simply the raw standard in and out but routed over a TCP connection, and can be treated as such. This allows us to follow the connection and see everything the attacker did. In Wireshark, we can simply right click the 101 Upgraded packet, and select Follow > TCP stream.

In this case, we can see the output from the apt-get install command run previously by the attacker. Often the attacker will also interact with scripts, and having access to the stream data is invaluable to see exactly what the attacker input is, as it would not otherwise be tracked.
Disk analysis
A disk capture is essential for understanding what an attacker did once they gained a foothold on a system, as a packet capture will not give a full picture. Log files, file metadata, and other disk based artifacts are invaluable to understanding what a payload did after it reached the system.
Mounting and initial analysis
In our case, we have the disk image in a raw dd-style format. This is convenient as it enables us to directly mount the disk as a loop device using losetup without needing any third party software as would be needed for qcow2 images. Once losetup is run, the disk is created as a loop device at /dev/loop0. We can then identify the root partition (usually the largest partition) and mount this as if it was any other drive by using the mount command.

As this is a compromised system, we want to specify options when mounting the disk. For example, mount -o ro,noexec,noload,nosuid,nodev <dev> <mount> instead. These options prevent writing to the device (to preserve artifacts) and prevent the execution of binaries, restricting any malicious payloads on the file system from being inadvertently executed.
From here, we can inspect the contents of the filesystem. In this case, the host system itself is untouched as the attacker did not break out of their container. However, it is very common for attackers to break out of Docker containers by creating a container with the root filesystem on the host passed through as a volume to the container. This allows the malware in the container to directly edit the host file system and for example, create a cron job on the host to cause a process to be run on the host (escaping the container). There are a number of other ways to break out in addition, including creating a privileged container and simply switching from the container namespace back to the host namespace.
Docker Explorer
As we know the attacker created a Docker container and the payload was run in this container, we will need to perform forensics on the container’s disk. To do this, we can use a Docker forensics tool called Docker explorer, which is maintained by Google.
Running the tool on our mounted disk, we can see the container created by the attacker:

It’s worth noting that Linux respects the permission of the mounted disk, so you may need to run the tool as root (or change the permissions of the Docker directory) to get the tool working.
Let’s mount the actual container file system so we can look through it. Docker explorer has a mount sub-command that can be used to mount a container to a given mountpoint.
Earlier in the blog we noticed the attacker uploaded two files to /usr/bin. We can retrieve those files for further analysis. Running the file command on them, they appear to be ELF executables.
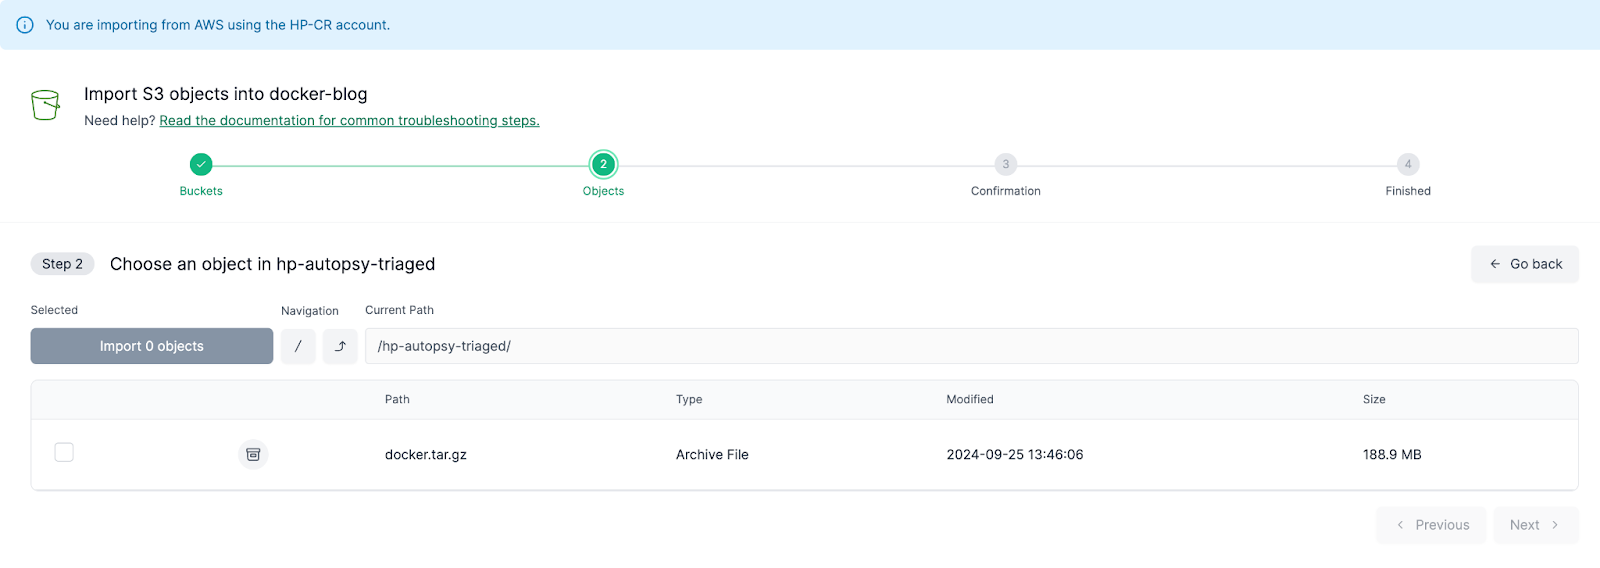
Searching through the file system is like searching for a needle in a haystack, so instead we can also archive the Docker file system into a tar.gz file, and upload it into the Cado Platform. The Cado Platform automatically processes the disk image and presents us with a timeline of what happened, detections, as well as interesting events.
Let’s create a new investigation and import the archive. In this case we have uploaded the archive to S3, so we will select our AWS account and pick our object from S3.
Once the analysis finishes, we are presented with the results of the automated investigation.
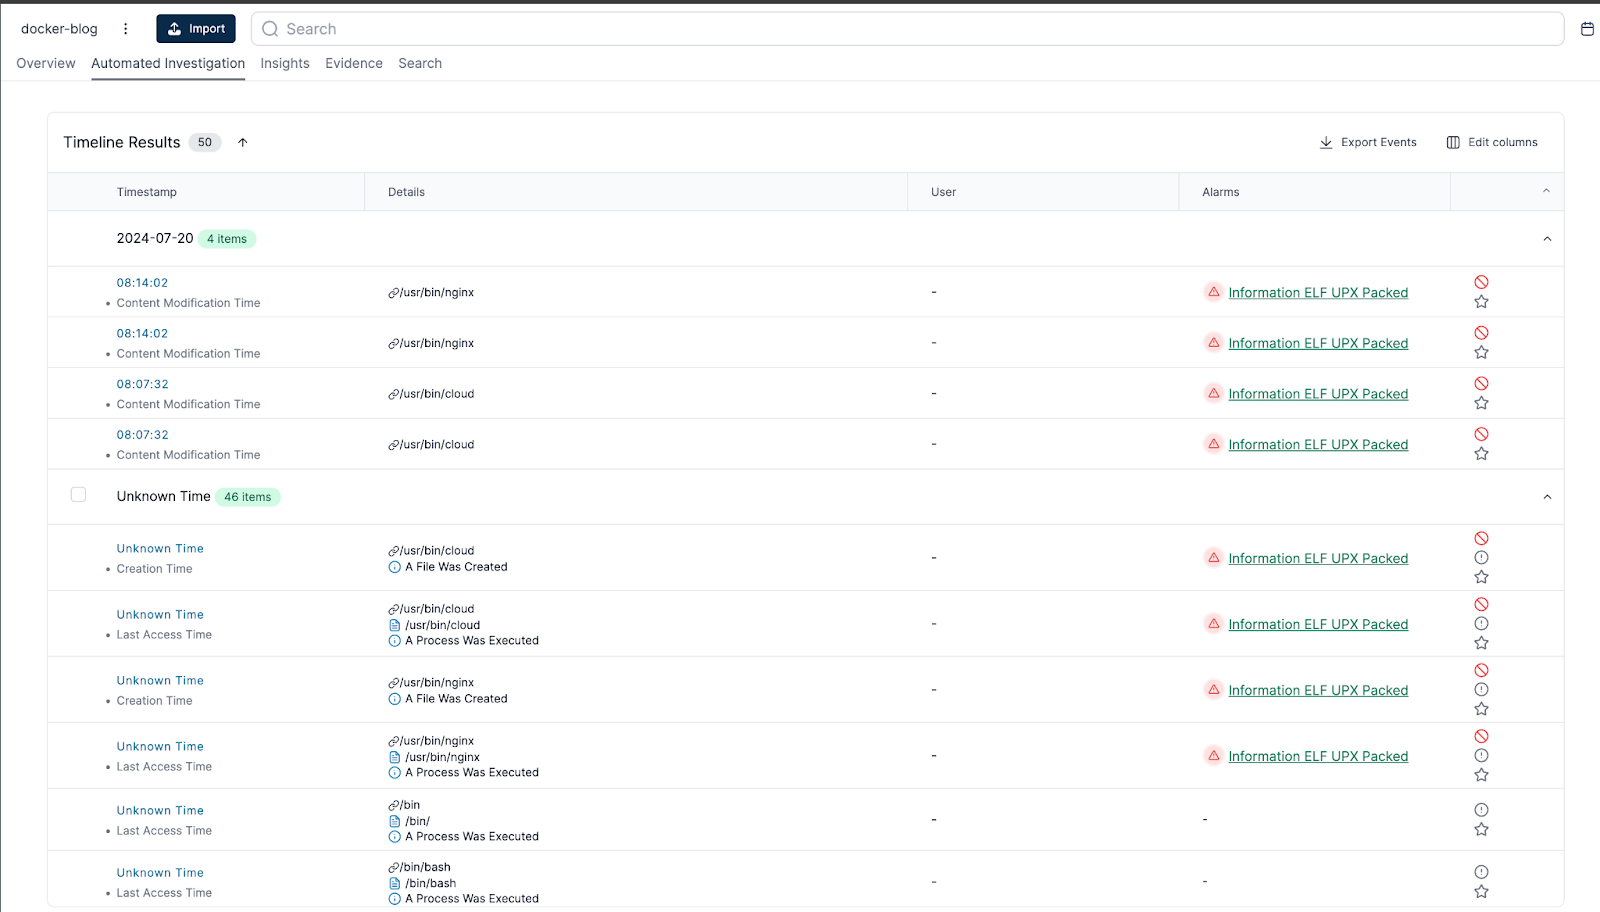
We can see here it has automatically identified the suspicious binaries, which we can now pivot on and look for other events.
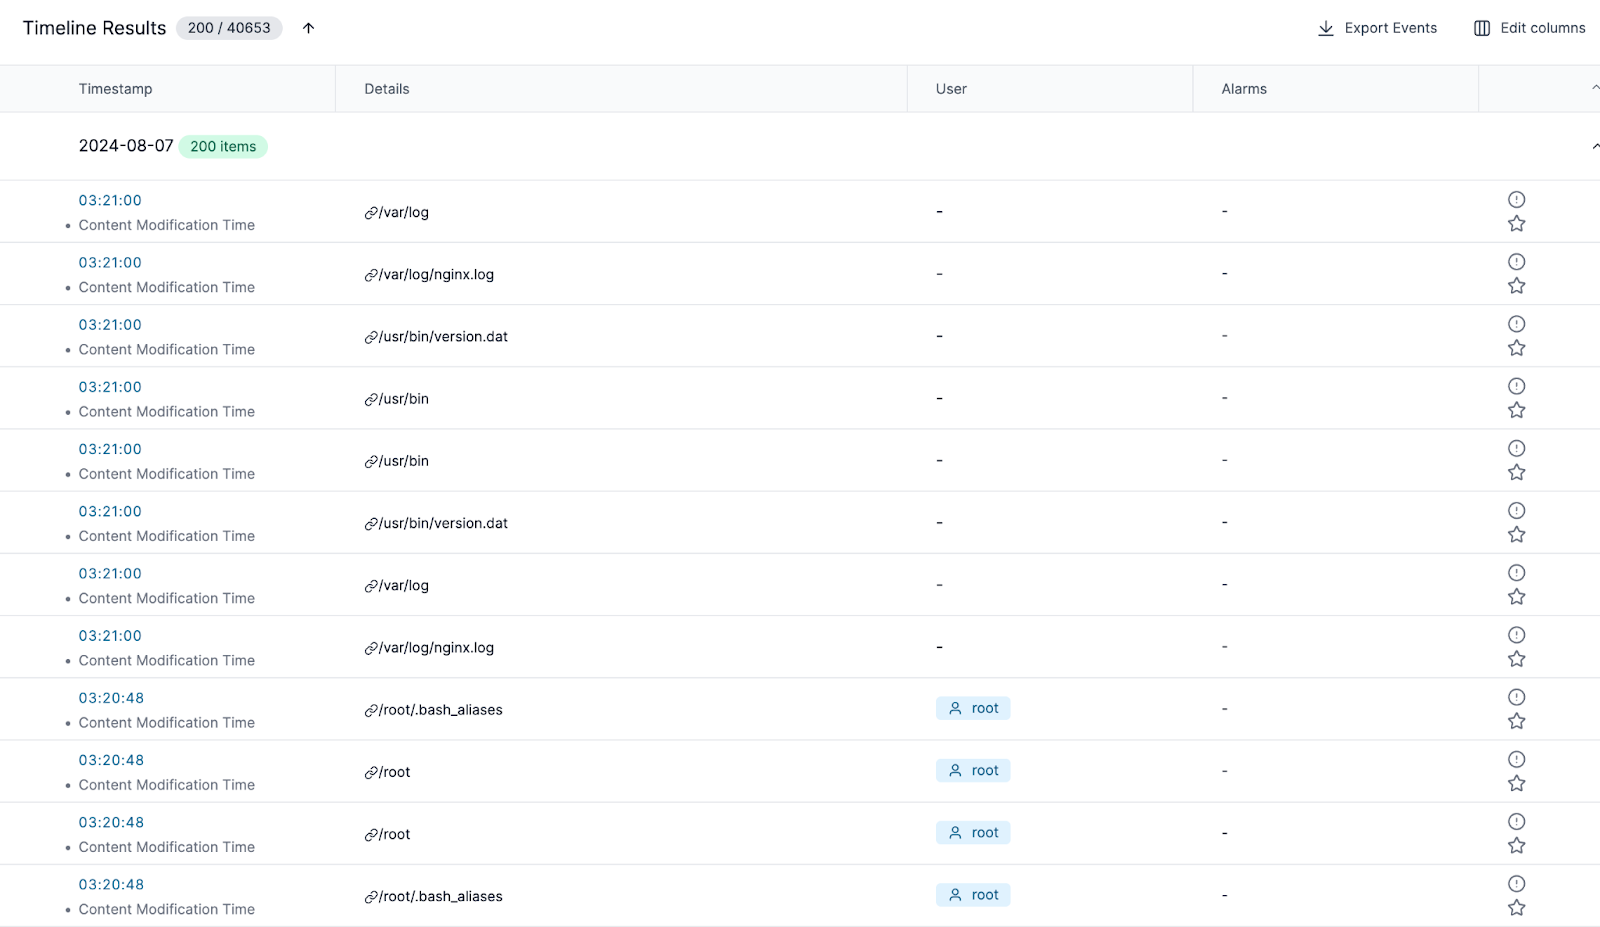
We can see a number of files were modified after the binaries were dropped. Taking a look at the file content, we can see that /root/.bash_alises is being used as a persistence mechanism, and that the binary has dropped a log file to /var/log/nginx.log and a version file to /usr/bin/version.dat.

Key Takeaways
Investigating Docker hijacking malware requires a combination of network and disk forensics, along with the use of specialized tools to fully understand an attack. Here are the main insights from our analysis of the compromised Docker host:
- Network captures offer critical insights: Packet captures provide a detailed view of the attack, from the initial compromise through to the execution of malicious activities. Filtering for Docker-specific traffic allows investigators to pinpoint how attackers exploited Docker APIs.
- Docker API misuse is a common attack vector: Attackers often use the Docker CLI to interact with the Docker API, downloading public images, creating containers, and executing commands. Recognizing these patterns in the network traffic can quickly identify malicious actions.
- Disk forensics fills in the gaps: While network captures show how the attack begins, disk images provide crucial information about what happens once the attacker has established a foothold. This includes identifying files the attacker uploaded, such as malicious binaries or scripts.
- Container breakouts are often hyped but rare: One of the most dangerous aspects of Docker hijacking is the possibility of attackers escaping the container and compromising the host system. In our case, the attacker remained confined to the container, but always check for signs of container escape in your analysis.
- Automated analysis tools can expedite investigation: Tools like Docker Explorer and platforms like Cado Security can automatically extract container-specific information and generate useful leads for further investigation. These tools are invaluable for scaling investigations, especially when time is of the essence.
By leveraging network captures, disk artifacts, and automated tools, investigators can effectively identify and analyze Docker hijacking malware. In Part 2 of this series, we will focus on dissecting the malware used in this attack and understanding its broader implications.
Ready to Strengthen Your Cloud Forensics?
If you’re looking to streamline your investigation process and gain deeper insights into containerized environments like Docker, the Cado Platform can help. With automated forensic analysis, timeline views, and easy integration with cloud-native environments, it empowers you to respond to incidents faster and more effectively.
Want to see how Cado can enhance your security operations? Request a demo today and discover how to stay ahead of threats in the cloud.
Tag(s):
Research & Threat Intel
More from the blog
View All PostsPart 2: Investigating Docker Hijacking Malware - A Deep Dive into ELF Binary Analysis
October 18, 2024Continue Reading
OracleIV - A Dockerised DDoS Botnet
November 13, 2023Continue Reading
The Nine Lives of Commando Cat: Analysing a Novel Malware Campaign Targeting Docker
February 1, 2024Continue Reading